
Pack trekking poles: they can reduce the impact on your joints by up to 20% during a Kilimanjaro trek. A practical Kilimanjaro packing list also includes layered clothing, sturdy footwear, a daypack, water containers, and the essentials for sleeping, first aid, and blister prevention. The mountain’s changing conditions make thoughtful preparation more useful than carrying gear simply because it appears on a list.
It’s natural to wonder whether trekking poles are worth the space, especially when every item needs to earn its place. This guide explains what to pack for your Kilimanjaro climb and how each item helps, from moisture-wicking layers and warm summit clothing to camp gear, medication, toiletries, and sun protection. You’ll also find tips for organizing your duffel and daypack, carrying water, and reducing the chance of blisters, so you can prepare carefully and focus on the trail ahead.
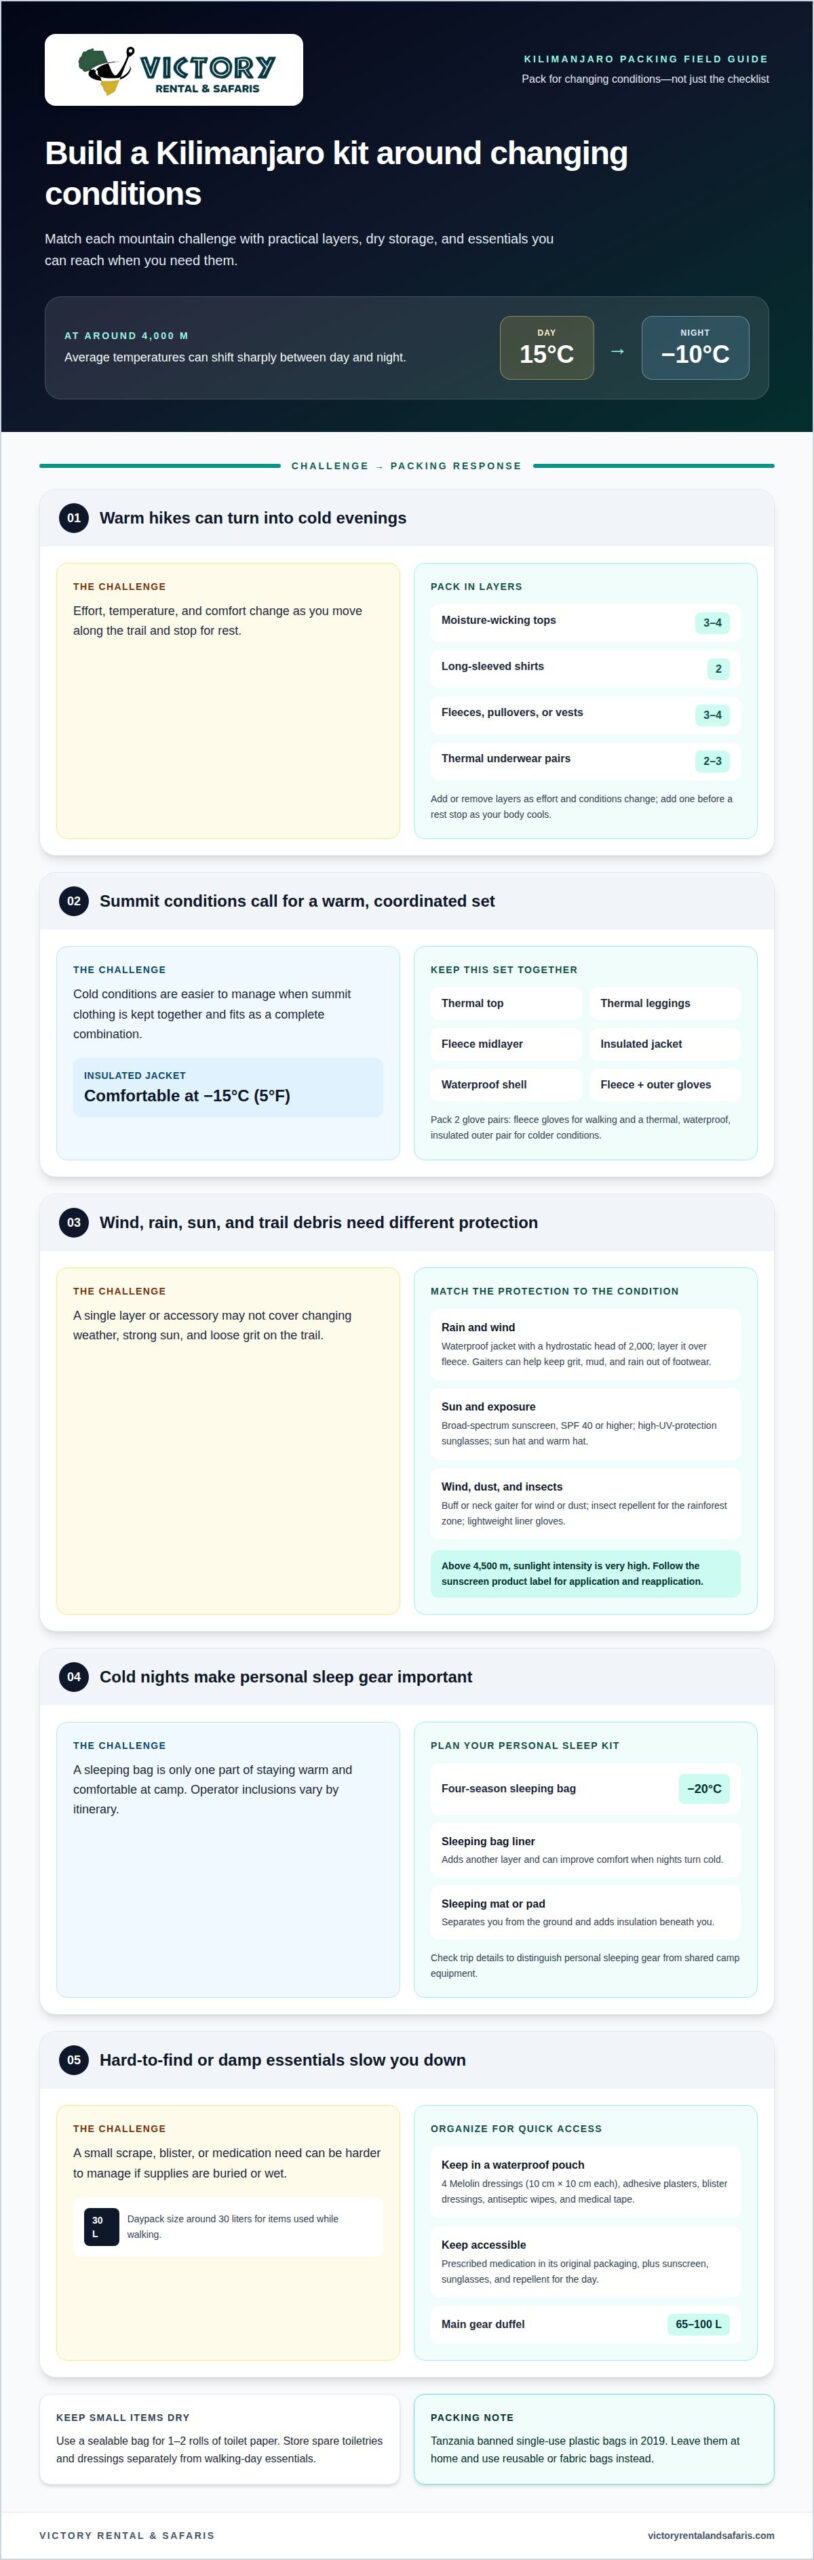
Pack a small, organized first-aid kit for the mountain, where a minor scrape or blister can make walking uncomfortable. Include four Melolin dressings, each measuring 10 cm by 10 cm, plus adhesive plasters, blister dressings, antiseptic wipes, and medical tape. Keep these supplies together in a waterproof pouch so you can find them quickly in your daypack. A practical Kilimanjaro packing list keeps these essentials easy to reach.
Bring any prescribed medication you normally need, in its original packaging, and keep it accessible rather than buried in your main bag. Add basic toiletries such as a toothbrush, toothpaste, biodegradable soap, and hand sanitizer. Pack 1-2 rolls of toilet paper in a sealable bag to keep them dry, and carry used paper out when required by your group’s waste procedures.
What items are prohibited or restricted in Kilimanjaro National Park? Tanzania banned all single-use plastic bags as of 2019, so leave them at home and use reusable or fabric bags instead. For other park restrictions, follow the current instructions provided for your trek; don’t assume an item is allowed simply because it appears on a general packing checklist.
Protect your face and hands from changing weather with a warm hat, a sun hat, and lightweight liner gloves. A buff or neck gaiter can cover your neck and lower face when wind or dust makes the trail uncomfortable. Store small accessories in an outer pocket so you can reach them without unpacking your bag.
Rain and loose trail debris call for practical protection for your clothing and boots. Pack a waterproof shell, and consider gaiters to help keep grit, mud, and rain out of your footwear. Store medication and first-aid supplies in a dry bag or waterproof pouch. Wet dressings or damp blister tape can be harder to use when needed.
Before departure, divide your kit into two groups: items for the walking day and supplies for camp. Put sunscreen, sunglasses, repellent, and essential medication in your daypack, and keep spare toiletries and dressings dry in a separate pouch. Use this Kilimanjaro packing list to keep essentials easy to find as conditions change on the mountain.
Build your hiking clothing in layers that can be added or removed as the mountain changes. Around 4,000 meters, average daytime temperatures reach 15°C, while nights average -10°C. A moisture-wicking base layer helps manage sweat, a warm midlayer adds insulation, and a weatherproof outer layer shields you from wind and rain.
For trekking days, pack 3-4 lightweight, moisture-wicking tops and 2 long-sleeved shirts. Add 3-4 fleeces, pullovers, or vests as midlayers, choosing pieces that fit comfortably over your base layer without restricting movement. Bring 2-3 pairs of thermal underwear, so you can keep a dry set for colder evenings or summit preparations.
Keep summit clothing together rather than scattering it through your bags. A long-sleeved thermal top, thermal leggings, fleece midlayer, insulated jacket, waterproof shell, and both glove layers make a practical combination for cold conditions. Adjust the order as your effort changes: open or remove a layer while climbing, then add one before a rest stop as your body cools.
Choose trekking trousers and thermal layers that allow a full stride and fit beneath your shell. Try the complete combination at home, including gloves, before packing. Check that cuffs overlap and that you can reach your pockets without removing layers. Set aside a dry thermal set for summit day, separate from clothing worn during damp or sweaty hikes.
For safari travel after the climb, pack a separate set of lightweight, comfortable clothing. A breathable shirt and long trousers work well for travel between a vehicle and a lodge, while a warmer layer can be useful on cooler evenings. Keep these clothes clean and dry in a separate packing cube so trail garments don’t transfer mud or moisture.
Hydration and clothing work together on steep sections: keep water within easy reach and adjust your layers before you become overheated or chilled. Use this clothing plan as a starting point, then tailor optional layers to your route, season, and comfort in cold conditions. A good fit matters as much as the number of items.
What sleeping bag temperature rating is recommended for Kilimanjaro? Choose a four-season sleeping bag capable of keeping you warm at -20℃ (-4°F). A sleeping bag liner adds another layer and can improve comfort when the night air turns cold.
What essential gear is provided by Kilimanjaro tour operators? Inclusions vary by operator and itinerary, so distinguish personal sleeping gear from shared camp equipment as you plan. Treat your sleeping bag, liner, and personal nighttime items as your own kit unless your trip details say otherwise.
A warm sleeping bag is only one part of a restful night. A sleeping mat or pad separates you from the ground and adds insulation beneath your bag. Check that it fits your sleeping area and stays stable when you shift position. A liner can also help keep the inside of your bag cleaner between nights.
Before the trek, test your sleeping bag, mat, and liner together at home. Lie down in the layers you expect to sleep in, then check that the bag closes comfortably and the mat supports your usual sleeping position. Keep a jacket nearby for warmth during camp routines, but avoid sleeping in damp trekking clothes.
Small comforts can make camp feel more settled. An inflatable pillow or a soft cover for packed clothing can support your head, while earplugs may help if nearby camp activity interrupts your sleep. Keep glasses in a hard case beside your headlamp rather than loose in a bag, where they could be crushed.
Plan your bedtime routine: change into dry sleepwear, keep damp clothes away from your sleeping bag, and store bottles upright in a secure spot. Keep water containers accessible, but away from places where a leak could soak your insulation. Pack sleep essentials together so you can set up without emptying your duffel.
Porters carry trek luggage, so keep your personal camp kit organized and easy to pack each morning. Use separate bags for your sleeping bag, mat, and small accessories to make repacking easier after a cold night. An orderly camp setup helps keep gear dry and leaves you ready for the next day’s climb.
Choose a daypack that carries the essentials you need while climbing, without making each step feel cumbersome. A 25-35-liter pack is a practical size for daily trail gear, while a capacity near 30 liters offers room for water, a camera, snacks, and an extra fleece. Adjust the shoulder straps and hip belt with the pack loaded before your trek.
Keep your main gear in a waterproof duffel with a capacity between 65 and 100 liters. Guide companies typically limit the duffel and gear carried on Kilimanjaro to 33 lbs. (15kg), so pack deliberately and leave space for a protective liner. Separate clean clothing from damp items in waterproof bags inside the duffel.
For hydration, a 2-3-litre bladder makes frequent sipping convenient, while a one-liter wide-mouth bottle gives you another container. A bottle is also easier to handle at camp or during a break. Tanzania’s mountain conditions can shift by season, so check that your chosen containers fit securely in the pack and remain accessible with gloves on.
Daily water needs and water carried at one time aren’t the same thing. Plan to drink 3-4 liters of water each day, then arrange your containers so they’re easy to refill and manage. If your setup includes a bladder, test its hose and bite valve before departure; a leak can soak a camera, fleece, or spare clothing.
Bring water-treatment tablets or a filter if your trek’s water plan calls for personal treatment, and follow the product directions. Keep treatment supplies in a sealed pocket, separate from snacks and clean drinking containers. For personal hygiene, pack hand sanitizer to use before eating; a small, quick-drying cloth is useful after washing.
Set up your daypack for easy access on the trail: carry water where you can reach it and keep energy bars in an outer pocket. Store fragile items, such as a camera, in a padded case inside the pack. Before setting out, walk with the loaded pack and check for shifting bottles, loose straps, or pressure points.
Use your duffel for camp and spare gear, not items you’ll need during the day. Before packing, check that your water containers, waterproof storage, trail snacks, and camera protection are ready together. Keeping these items organized separately makes your walking kit easier to access and your larger bag tidier.
Choose supportive, broken-in hiking boots for your Kilimanjaro trek, then test them on uneven ground with the socks you plan to wear. Your heel should feel secure while your toes have room to move downhill. Try the boots with your trekking layers, since thicker socks can change the fit. New boots may rub in places you didn’t notice during a short fitting.
Bring 3-4 pairs of outer socks and 2-3 pairs of liner socks. Liners add a close-fitting layer beneath your trekking socks, while outer socks provide cushioning inside your boots. Wool socks are another useful option; pack 4-5 pairs if you prefer changing into a fresh pair each day. Choose a combination that fits comfortably without bunching at the toes or heel.
At the first sign of rubbing, stop and address it rather than waiting for a painful blister. Check your heels, toes, and the sides of your feet, then smooth any folded sock fabric. Apply a blister dressing or tape to the rubbing point, and change into dry socks when available.
Use trekking poles to steady your stride on descents, where repeated steps can increase pressure on your toes and heels. Adjust the pole length so your hands rest comfortably on the grips, and secure the straps before walking. Keep gloves accessible if cold hands make it difficult to grip firmly.
Trail conditions change as the route climbs from forest paths to higher-altitude terrain. Mud, grit, and wet ground can make secure footing especially important, so fasten your boot laces evenly and check them during breaks. Gaiters can help keep debris out of your footwear, while spare laces are a simple backup if one breaks.
Pack socks and blister supplies where they’re easy to reach, not at the bottom of your duffel. Before leaving camp, check both feet and put on dry socks. After a toilet stop or stream crossing, make sure your footwear and laces still feel comfortable. These quick checks can keep a minor hot spot from becoming a bigger problem.
Planning a climb starts with matching footwear and support to the route. Explore the Mount Kilimanjaro climbing options as you prepare your gear and training plan.
Victory Rental & Safaris can help plan the next part of your Tanzania journey beyond the mountain. If you’d like to pair your trek with a safari, options include the Serengeti Great Migration and the Masai Mara to Serengeti & Ngorongoro Safari Adventure. This gives you a way to plan your climb and wildlife experience as part of one wider trip.
Keep your packing decisions focused on the trek, then consider what you’ll need for the landscapes and activities that follow. Clothing and gear suited to mountain conditions may differ from what feels comfortable on safari, so plan for each part of your journey in its setting.
Contact Victory Rental & Safaris to discuss the Tanzania journey you have in mind.
Use your Kilimanjaro packing list as a starting point for planning the rest of your journey. Once your mountain plans take shape, consider what you’d like to experience next: the Serengeti Great Migration, a Masai Mara to Serengeti & Ngorongoro Safari Adventure, or a Mikumi Safari from Zanzibar. Each offers a different way to continue exploring, with open landscapes and wildlife encounters adding a new chapter to your travels.
The next step is to bring those ideas together with your preferred route and travel style. Victory Rental & Safaris can help you consider how a climb and safari might fit into a broader Tanzania itinerary. Contact Victory Rental & Safaris to discuss your journey, then look forward to the trail ahead and the stories that follow.
Consider trekking poles if you value extra balance on irregular ground or feel steadier using them. Their usefulness depends on your walking style and the terrain, so practice coordinating your steps before the climb. Keep your grip relaxed and plant each pole where it supports your next step rather than reaching far ahead. Poles should support your rhythm, not force a longer stride.
Pack by purpose: organize equipment for walking, sleeping, personal care, and changing conditions. Before closing your bags, lay everything out and remove duplicates that serve the same purpose. Keep personal essentials accessible, and separate items needed during the day from equipment used only at camp. This final sort makes your load easier to manage throughout the climb.
Choose clothing that lets you adjust as your effort and exposure change. A practical system combines a base layer, insulation, and an outer barrier, with pieces that fit comfortably together. Try the full combination while walking, then check that you can add or remove a layer without unpacking. Your route, the season, and your comfort in cold conditions will shape the final choices.
Choose boots that fit your foot shape securely and stay comfortable over a full walking day. Check that your toes aren’t pressed forward on descents and that your heel stays stable as you walk. Try the boots with your intended socks and lacing method. Watch for pressure points during a practice walk, as small fit issues can become distracting on a long trek.
Bring the personal-care products you rely on daily, along with items for your individual health and hygiene routine. Keep medicines in their original packaging and store them where they won’t be crushed or exposed to moisture. A compact wash kit is easier to manage at camp than loose toiletries. Review your personal essentials before departure, especially items that would be difficult to replace during the trek.
Choose a system that lets you drink conveniently while walking and refill without struggling with your pack. A bladder offers hands-free access, while a separate bottle gives you another way to carry and manage water. Make sure every part is easy to clean and closes securely. Test the setup while wearing your loaded daypack so you can comfortably reach the drinking tube or bottle on the trail.
Carry your personal prescriptions and a compact kit for minor problems, but don’t use altitude medication without a plan suited to your health. Before travel, discuss your itinerary, medical history, and existing prescriptions with a qualified clinician. Keep a written list of allergies and medications with your kit, and tell your guide about relevant health needs before the trek begins.
Follow the porter-carried luggage allowance set for your trek, and keep personal walking gear separate from your main bag. A durable, soft-sided duffel is practical for organizing equipment, while smaller internal bags help separate clean clothing from used items. Weigh the packed bag before travel and remove nonessential duplicates if it exceeds the stated allowance. Keep valuables and items needed during the day with you.
{
“@context”: “https://schema.org”,
“@type”: “FAQPage”,
“mainEntity”: [
{
“@type”: “Question”,
“name”: “To use trekking poles or not?”,
“acceptedAnswer”: {
“@type”: “Answer”,
“text”: “Yes, consider poles if you value extra balance on irregular ground or feel steadier using them. Their usefulness depends on your walking style and the terrain, so practice coordinated steps before the climb. Keep your grip relaxed and plant each pole where it supports your next step, rather than reaching far ahead. Poles should assist your rhythm, not force a longer stride.”
}
},
{
“@type”: “Question”,
“name”: “What should I pack for climbing Mount Kilimanjaro?”,
“acceptedAnswer”: {
“@type”: “Answer”,
“text”: “Pack by purpose: organize equipment for walking, sleeping, personal care, and unexpected changes in conditions. Before closing your bags, lay everything out and remove duplicates that serve the same purpose. Keep essential personal items accessible, and separate anything you’ll need during the day from equipment used only at camp. This final sorting pass makes your load easier to manage throughout the climb.”
}
},
{
“@type”: “Question”,
“name”: “What clothing layers are needed for Kilimanjaro by altitude and season?”,
“acceptedAnswer”: {
“@type”: “Answer”,
“text”: “Choose clothing that lets you adjust as your effort and exposure change. A practical system uses a base layer, insulation, and an outer barrier, with pieces that fit comfortably together. Try the full combination while walking, then check that you can add or remove a layer without unpacking. Your route, the season, and your own comfort in cold conditions shape the final choices.”
}
},
{
“@type”: “Question”,
“name”: “What are the best boots and socks for a Kilimanjaro trek?”,
“acceptedAnswer”: {
“@type”: “Answer”,
“text”: “The best choice is footwear that fits your foot shape securely and remains comfortable over a full walking day. Check that your toes aren’t pressed forward when descending, and that your heel stays stable as you walk. Try the boots with your intended socks and lacing method. Pay attention to pressure points during a practice walk, since small fit issues can become distracting on a long trek.”
}
},
{
“@type”: “Question”,
“name”: “What personal items and toiletries should I bring on Kilimanjaro?”,
“acceptedAnswer”: {
“@type”: “Answer”,
“text”: “Bring the personal-care products you rely on daily, along with any items needed for your individual health or hygiene routine. Keep medicines in their original packaging and store them where they won’t be crushed or exposed to moisture. A compact wash kit is easier to manage at camp than loose toiletries. Review your personal essentials before departure, especially items that would be difficult to replace during the trek.”
}
},
{
“@type”: “Question”,
“name”: “How much water and what hydration system should I carry on Kilimanjaro?”,
“acceptedAnswer”: {
“@type”: “Answer”,
“text”: “Choose a system that lets you drink conveniently while walking and refill without struggling with your pack. A bladder offers hands-free access, while a separate bottle gives you another way to carry and manage water. Make sure all parts are easy to clean and close securely. Test the setup while wearing your loaded daypack, so you can reach the drinking tube or bottle comfortably on the trail.”
}
},
{
“@type”: “Question”,
“name”: “What first-aid supplies and medications should I pack for altitude sickness?”,
“acceptedAnswer”: {
“@type”: “Answer”,
“text”: “Carry your personal prescriptions and a compact kit for minor problems, but don’t use altitude medication without a plan suited to your health. Discuss your itinerary, medical history, and existing prescriptions with a qualified clinician before travel. Keep a written list of allergies and medications with your kit, and tell your guide about relevant health needs before the trek begins.”
}
},
{
“@type”: “Question”,
“name”: “What luggage weight limits and duffel requirements apply on Kilimanjaro treks?”,
“acceptedAnswer”: {
“@type”: “Answer”,
“text”: “Follow the porter-carried luggage allowance set for your trek, and keep personal walking gear separate from the main bag. A durable, soft-sided duffel is practical for organizing equipment, while smaller internal bags help keep clean clothing apart from used items. Weigh the packed bag before travel and remove nonessential duplicates if it exceeds the stated allowance. Keep valuables and items needed during the day with you.”
}
}
]
}